
Tagged: EM tramp, Tramping with science
- This topic has 0 replies, 1 voice, and was last updated 4 years, 7 months ago by Tony Gazley.
-
AuthorPosts
-
-
Tony GazleyParticipant
Have you ever wondered why a rainbow disappears when you view it through polaroid sunglasses? Or why the rivers flowing out of the Tararuas towards the east make a kink 7 km to the south. Or how to find your altitude by boiling water? Or why you need to pyrolise wood before a campfire will burn, why you feel colder when there is a wind blowing, how much heat is lost through seams in your clothing and sleeping bag, and what little critters may be lurking outside your tent during the night?
Well, Kate did and, together with Illona, Karen, Uta, Kevin, Tony, Pete and Juan, set out on a trip to Mitre Flats to find the answers. We were carrying normal tramping gear, plus sunglasses, geological maps, thermometers, a thermal imaging camera, and tracking tunnels. And we were all in the mood to think about, and discuss, what was going on around us and why. We made some observations, did a few experiments, asked each other lots of questions, and came back a bit more enlightened after a very different sort of fun weekend tramp in the hills.
We got off to a good start when a rainbow appeared just as we were packing to leave the Pines, and that immediately gave us our first experiment.
Experiment 1
Aim: To understand why a rainbow disappears when viewed through ‘Polaroid’ sunglasses.
Apparatus: Tramper, sunglasses, rainbow.
Method: View rainbow normally, then through sunglasses, then again with head tilted 90 degrees.
Result and explanation: Polaroid sunglasses are polarised vertically (to reduce reflections from wet horizontal surfaces such as water). The light from a rainbow is also polarised (by reflection and refraction in raindrops) but is essentially polarised in the direction of the arc ie horizontally at the apex. So the top part of a rainbow viewed through Polaroid glasses will not be visible – except if you tilt you head 90 degrees and then your glasses are also polarised horizontally and hey presto the rainbow reappears.
Experiment 2
Aim: To determine why the track to Mitre Flats following the Waingawa River heads north, whereas further upstream, and lower down, the river heads more easterly towards the plains.
Apparatus: Tramper, river, map.
Method: Check the track direction with respect to the direction of the major fault lines traversing the Tararuas especially the Wellington Fault.
Result and explanation: The Wellington Fault comes ashore on Wellington’s south coast, carries on up Long Gully and through Karori, under Parliament Buildings and the ferry terminal, along the western side of the Hutt Valley, past Kaitoke—where it takes a 2 km side-step to the east—up the Tauherenikau Valley, over Cone Saddle, through Totara Flats, continues through Pig Flat, the Atiwhakatu and then crosses into the Waingawa Valley at the low point in Pinnacle Ridge just where the climb to Baldy starts. It continues to Cow Saddle before finally leaving the Tararuas at Putara and becoming the Mohaka Fault after it crosses the Manawatu River. So the Barra Track follows the river where it has eroded itself a valley along the line of the fault where the rock is crushed and weakened by fault movements.
Geologist are able to decipher the clues that are left by fault movements and from these estimate the rate that they are moving and the date the fault was last active. The date for the most recent movement of the segment of the Wellington Fault between Wellington and Kaitoke is generally well known and accepted as approximately 400 years ago, and for the segment from Putara northwards as approximately 240 years ago. But until recently there was no data for the Tararua segment between Kaitoke and Putara. Now, however, after a number of boreholes were sunk at Totara Flats there is a clearer idea of how the flats came to be, and the most recent movement of this segment is now thought to be approximately 1,150 years ago.
If you get a Tararua map and cut along the line of the Wellington Fault and then move the western piece about 7 km south you will find the main rivers such as the Ruamahanga, Waingawa, Waiohine, and Taheranikau join up again and run directly eastwards without a southward kink. And this is because over the life of the Wellington Fault the western side, in the Tararuas at least, has moved about 7 km north relative to the eastern side—and the rivers have been forced to flow that much south along the line of the fault before being able to once again flow eastwards out towards the Wairarapa Plains.
For more info go to Some Faults in the Tararuas.
Experiment 3
Aim: To estimate altitude by boiling water.
Apparatus: Tramper, tall hill, billy and cooker, thermometer.
Method: Measure the temperature of boiling water in Mitre Flats Hut. Walk part way up the track to Mitre and repeat.
Result and explanation: The boiling temperature of water decreases with increasing altitude. At the top of Mt Everest the boiling temperature is only 71oC. The first person to climb Taranaki/ Mt Egmont estimated the height by carrying up firewood, boiling a billy, and measuring the water temperature (accurate aneroids did not exist at the time), and came up with a height quite close to today’s surveyed height.
We measured the boiling temperature at 99.9oC at the hut and then 99.6oC after climbing someway up the track (actually not very far as there was a strange lack of enthusiasm – perhaps because of the heavy rain showers).
We knew the expression for calculating the change in temperature with altitude but we carried printed simple tables to make it easy. From the tables and with our measured difference in boiling temperature we figured we had climbed about 500 m. From the map we estimated we were 420 m above the hut. So – given that our thermometer was accurate only to about 0.1oC and we had not climbed very high we were happy with the result.
Experiment 4
Aim: To understand the three requirements for burning – fuel, oxygen, and heat. And especially the heat requirement.
Apparatus: Cold tramper, firewood, fireplace, lighter.
Method: Start a fire with small kindling then gradually increase size of wood. Continue until tramper is toasty.
Result and explanation: We started a very small fire using thin dry sticks over the standing flame from a small piece of burning bicycle tube. As the fire slowly developed larger sticks could be added until after about 20 minutes quite large logs were used and the fire began to heat the hut.
Most solids, including wood, do not burn but first require chemical decomposition (pyrolysis) to yield gaseous products of sufficiently low molecular weight that will enter a flame, oxidise, and release heat.
Wood is a complex mixture of natural polymers of high molecular weight the most important being cellulose and lignin. Plus it contains moisture which needs to be evaporated at 100oC before the wood can be heated further. To begin to thermally decompose the wood needs to be heated to about 450oC and the simplified chemical equation would be:
6C10H15O7 + heat = C50H10O + 10CH2O. These products then react with oxygen in the air:
CH2O + O2 → H2O + CO2 + CO + C + heat. Some of this heat generated is reflected back onto the fire which then causes a positive feedback and the fire develops.
So if you are having trouble lighting a fire just think that beyond fuel and air you need sufficient heat to evaporate water in the wood, then heat it to about 450oC before combustible volatiles are produced. Then have as much of the heat as possible reflected back into the fire to increase the rate of pyrolysis. Which is why a well-constructed fire place of stones around three sides to reflect heat radiated from the flames back into the fire will make for a hotter more efficient fire).
This brought us to the gnarly question of burning plastic waste. Most of those on the trip were against it – but one offered the idea that given that most single-use plastic bags are manufactured from polypropylene which is derived from natural gas or petroleum and has the simple chemical formula of (C3H6)n and when burnt gives mainly carbon dioxide and water, it is therefore actually less harmful than burning wood. However, this certainly does not apply to other plastics such as PVC, polyurethane and even polystyrene, which may contain nitrogen and do release some really nasty products. So – discarded supermarket shopping bags – to burn or not to burn remained unsettled!
Experiment 5
Aim: To understand wind-chill and measure the heat lost through the seams in clothing.
Apparatus: Tramper, cold weather clothing, infrared camera and the MetService wind-chill expression: Twc = 13.112 + 0.6215 Ta -11.37 V0.16 + 0.3965 Ta V0.16.
Method: Photograph tramper in various states of dress with thermal imaging camera to determine heat leakage areas.
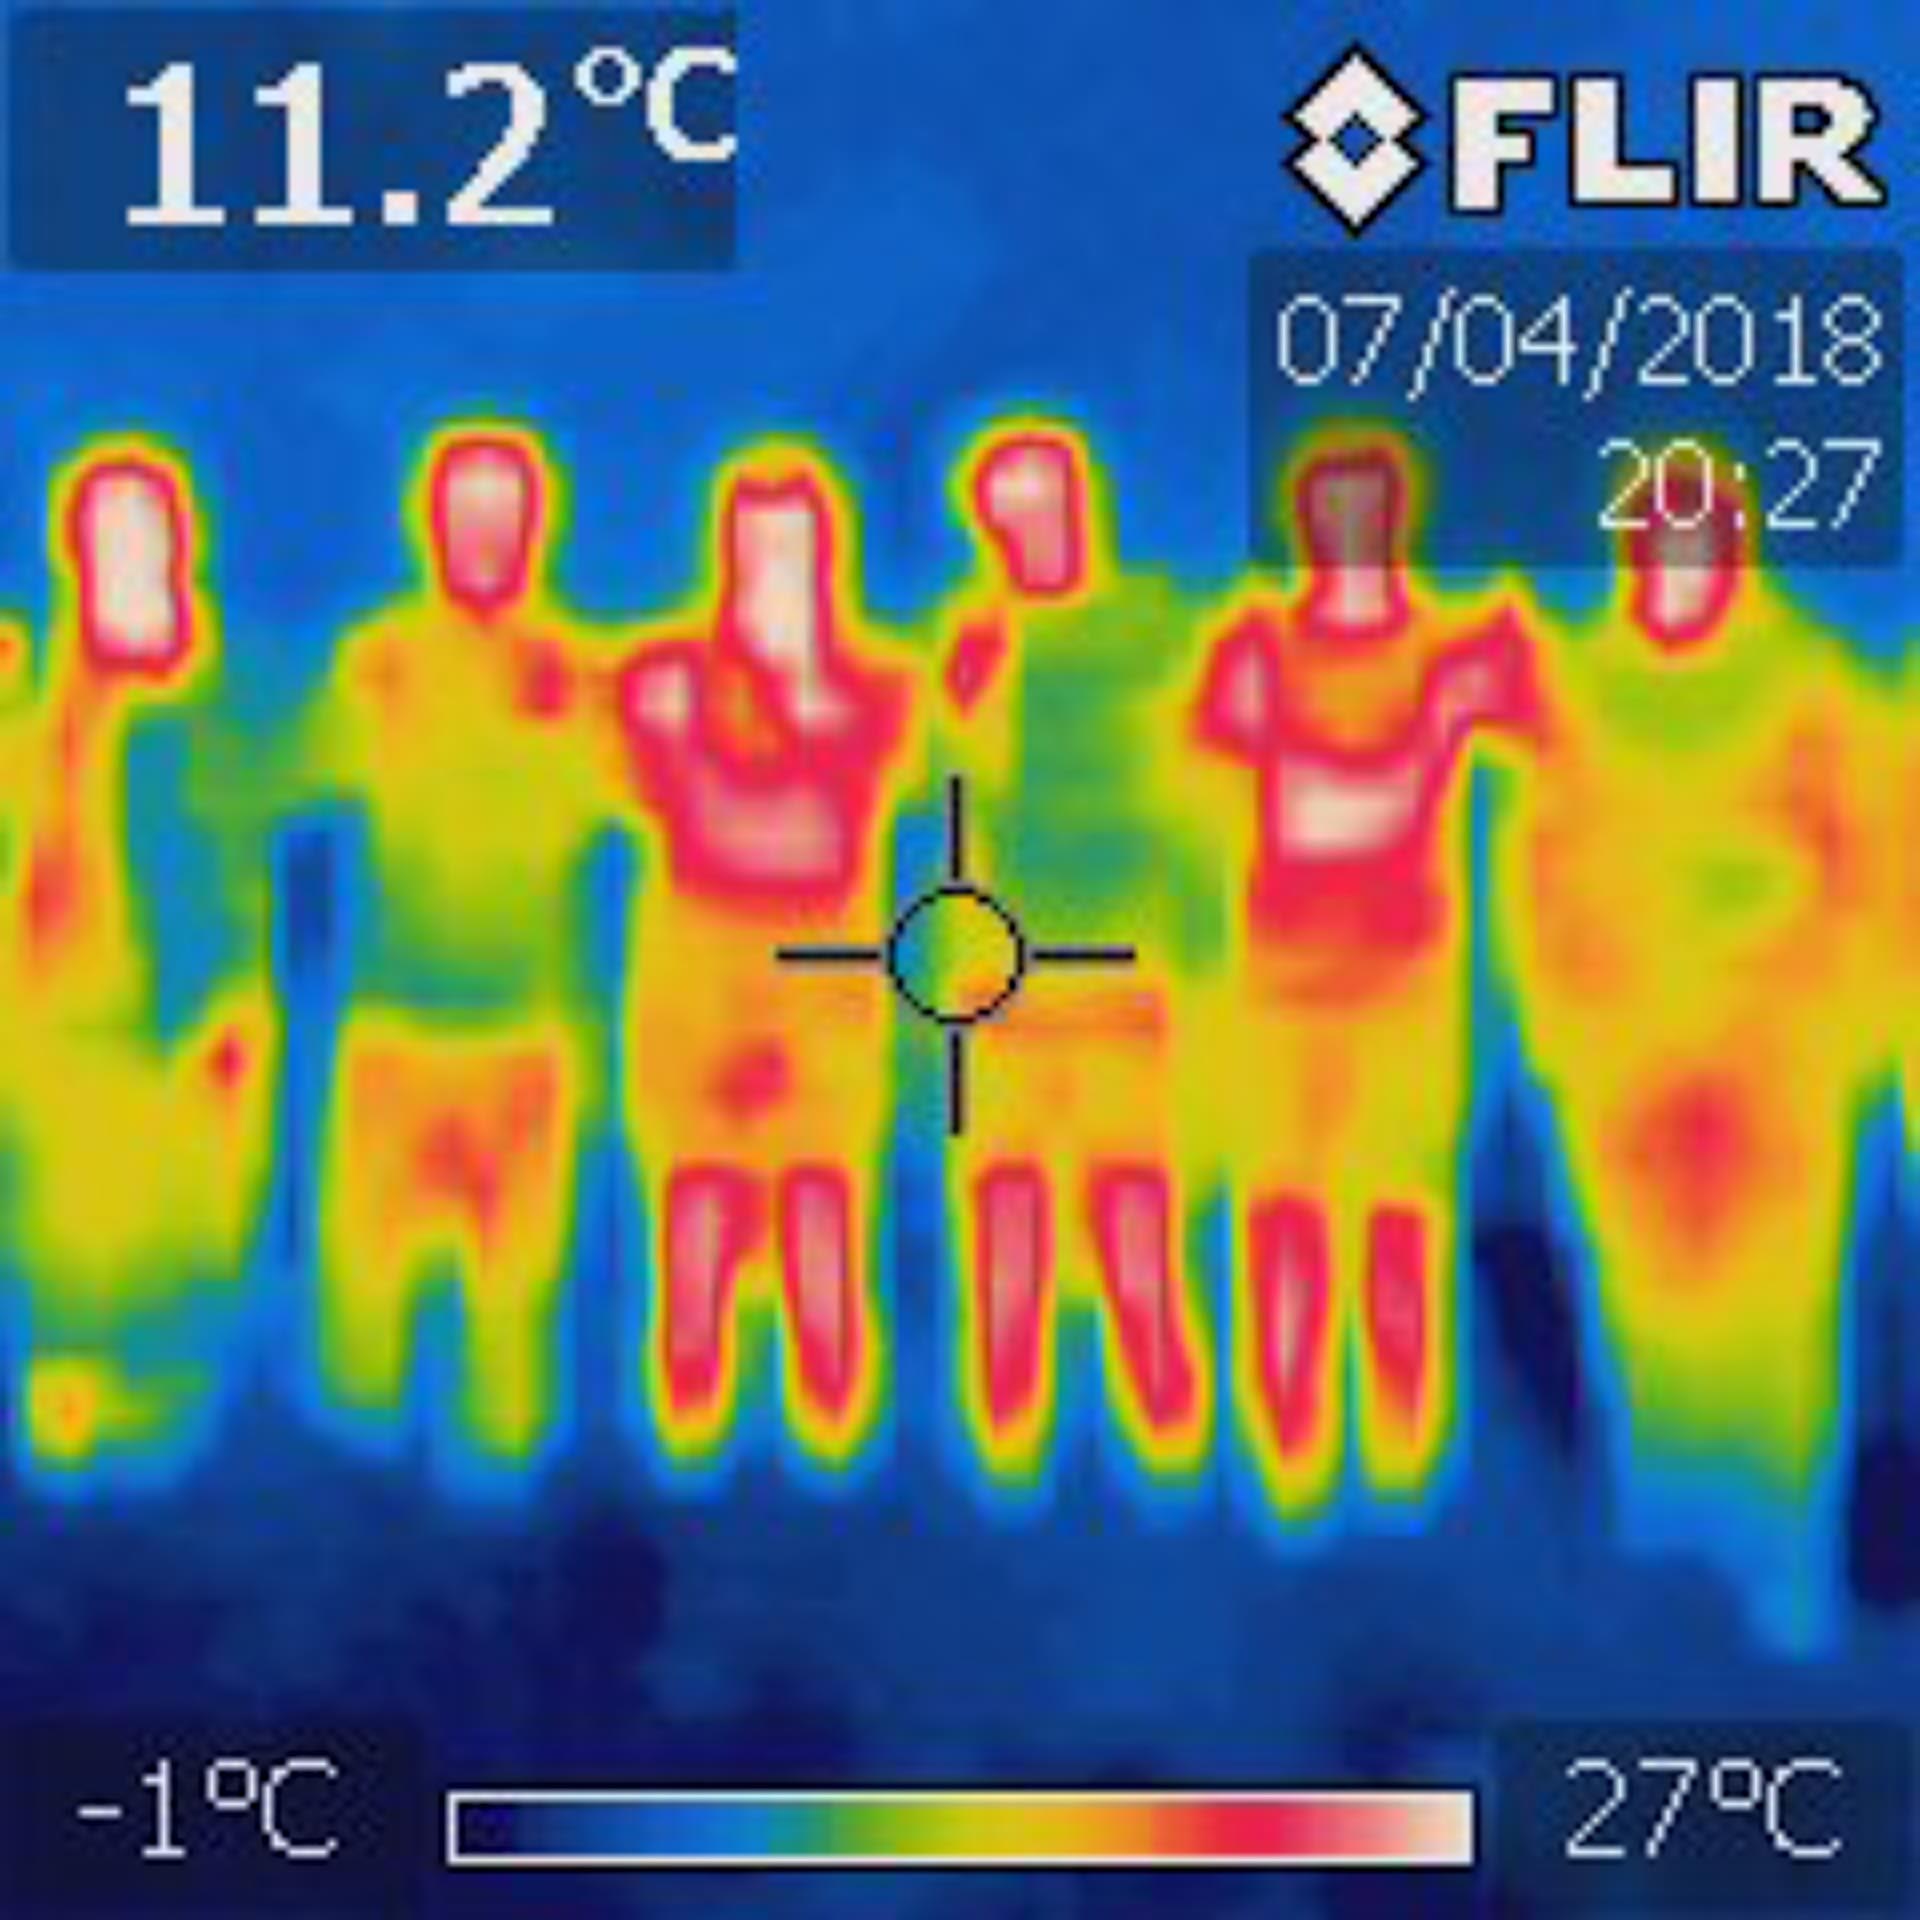
Result and explanation: The MetService uses the expression given above to determine wind-chill (a term they also call the ‘feels like’ temperature), where Twc is the wind-chill, Ta is the measured still air temperature, and V is the wind speed. There are a number of simplifications and assumptions in this calculation (such as your skin is dry) but nevertheless it is a useful measure for trampers. For example the wind-chill at Powell Hut today is given as 4oC, which means the temperature you would feel outside in the wind would be equivalent to that if you shut yourself in your fridge. However, the temperature you would measure inside the hut without the wind may be something like 10oC. Knowing likely wind-chill temperatures for alpine trips is useful, for example with a wind-chill of about -20oC bare dry skin will become frostbitten in less than 30 minutes, and this can occur with a wind of 50 km/hr and temperature of -12oC which are not unusual conditions in the NZ mountains.
Tramper with light wool top, light wool hat and mittens and thin wool longs. White areas are bare skin, red areas are high heat loss. Not much to keep you warm here. 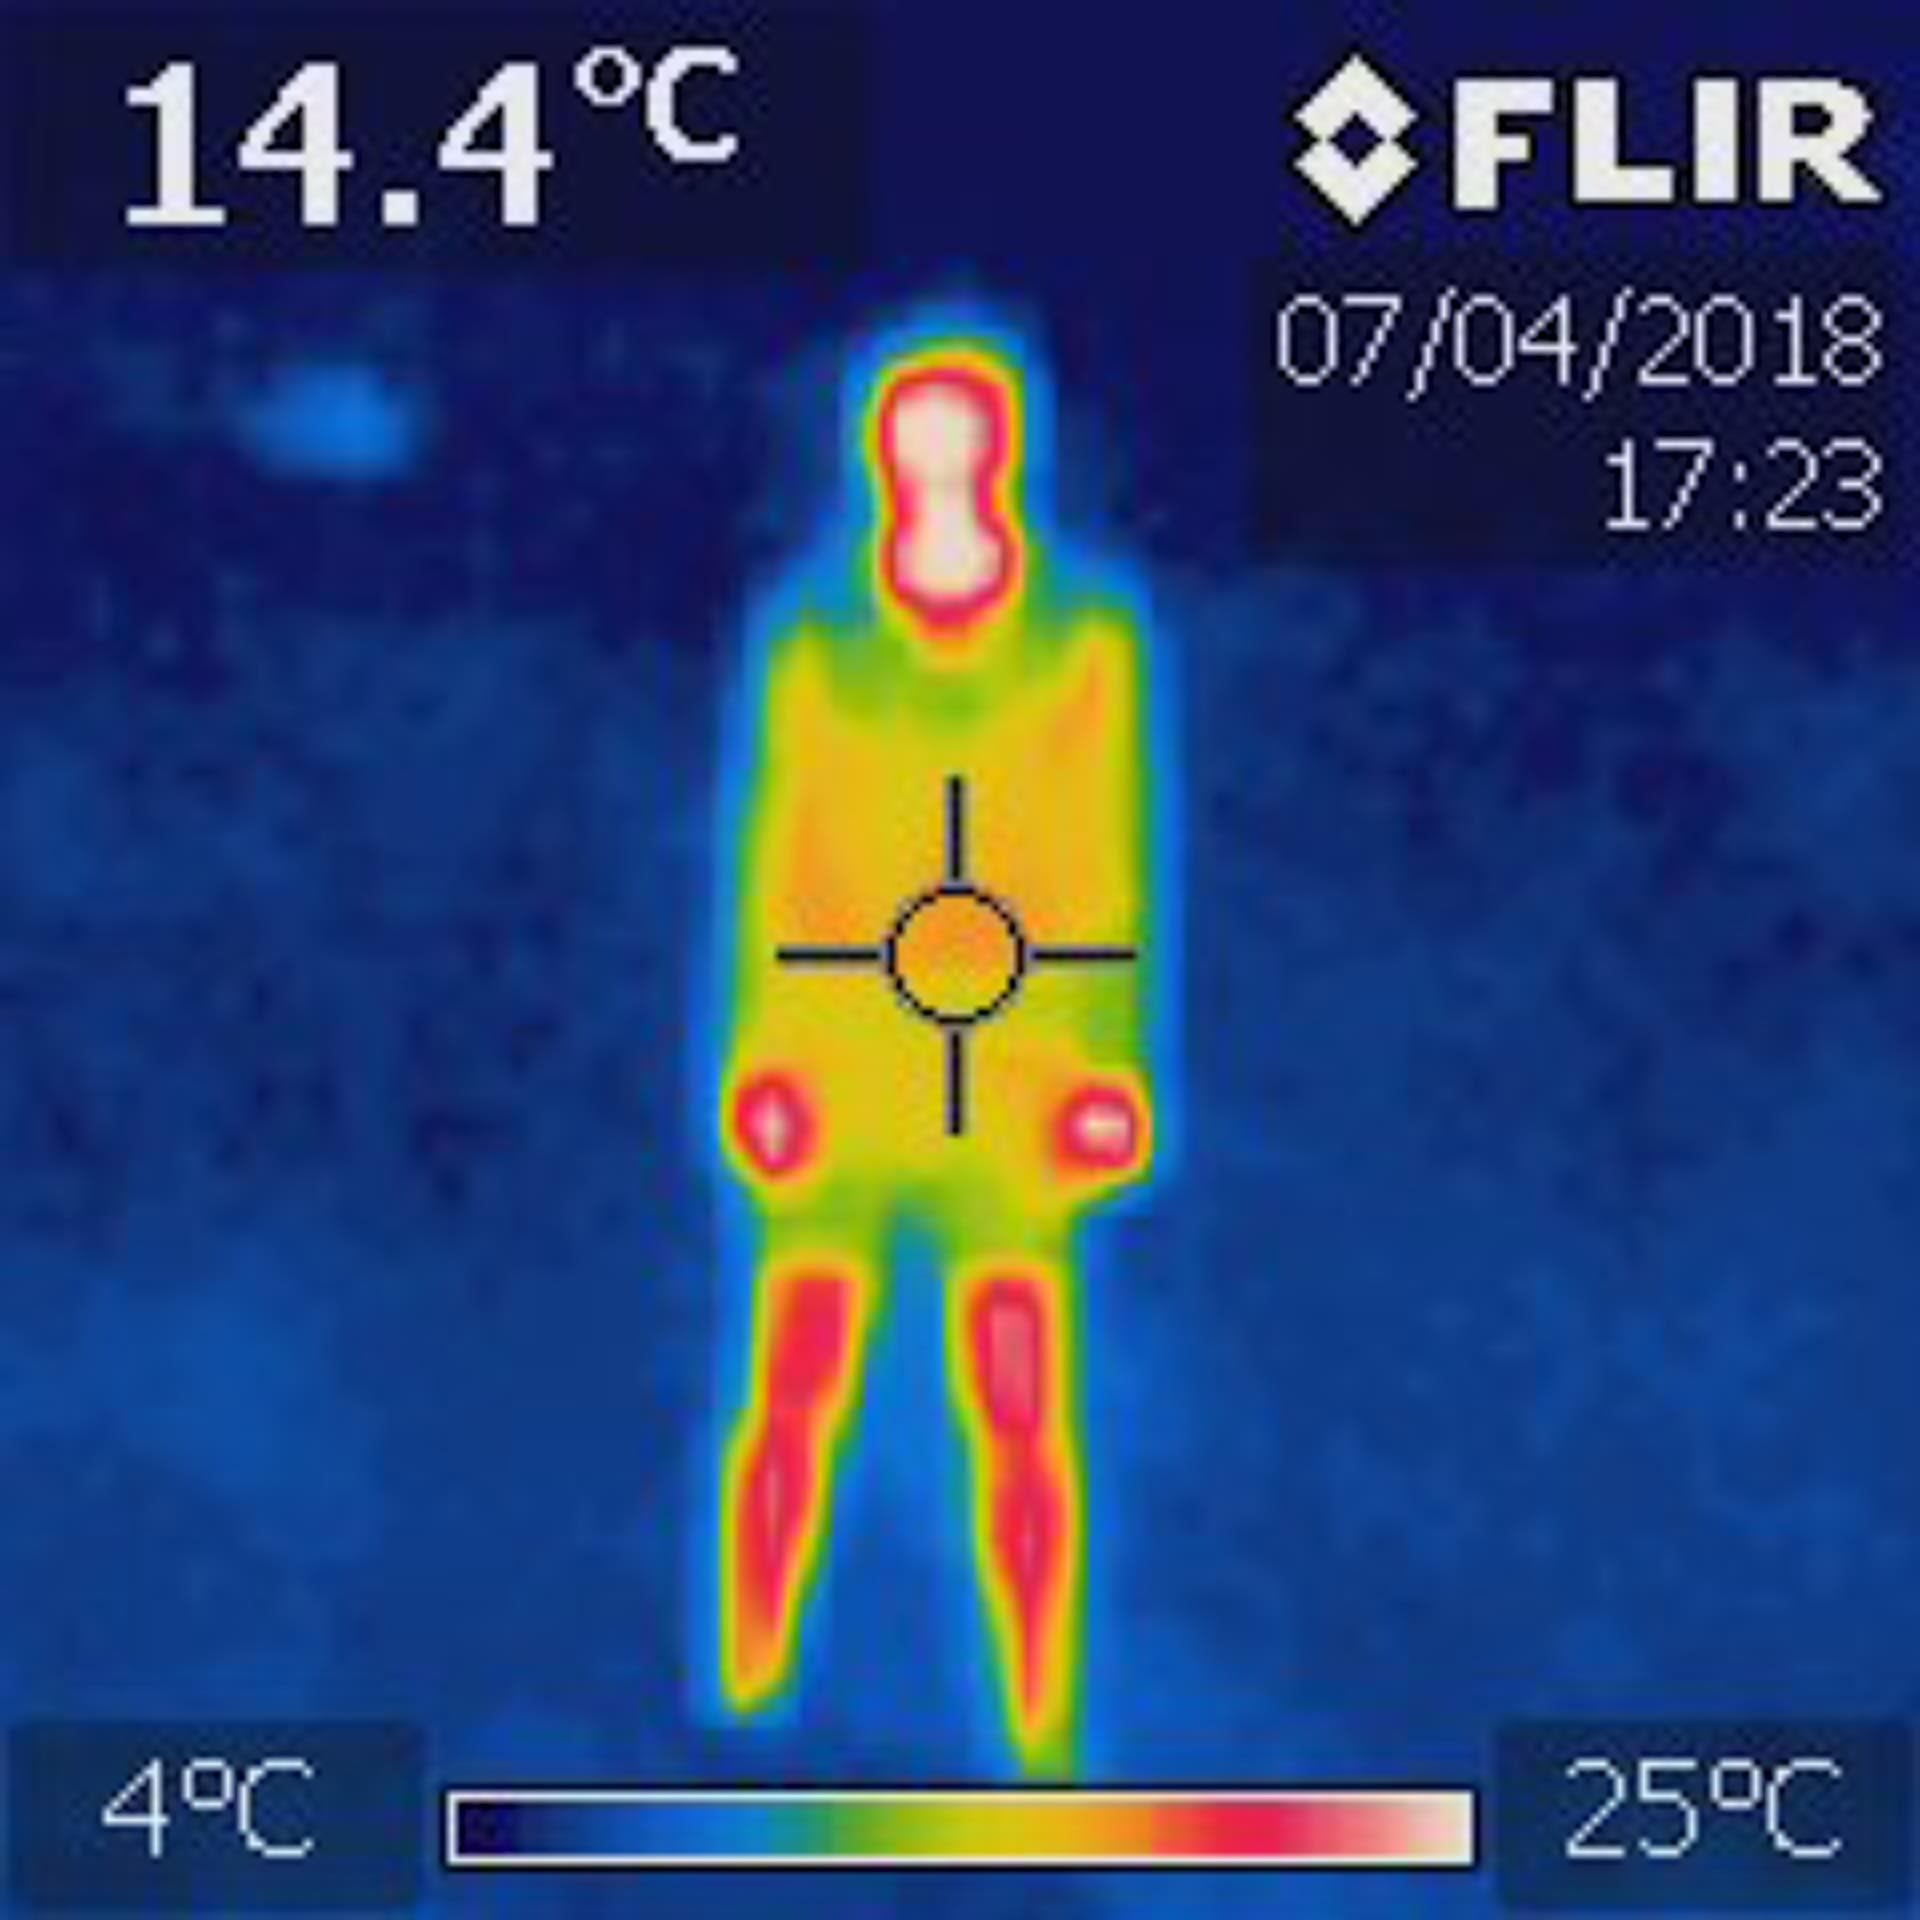
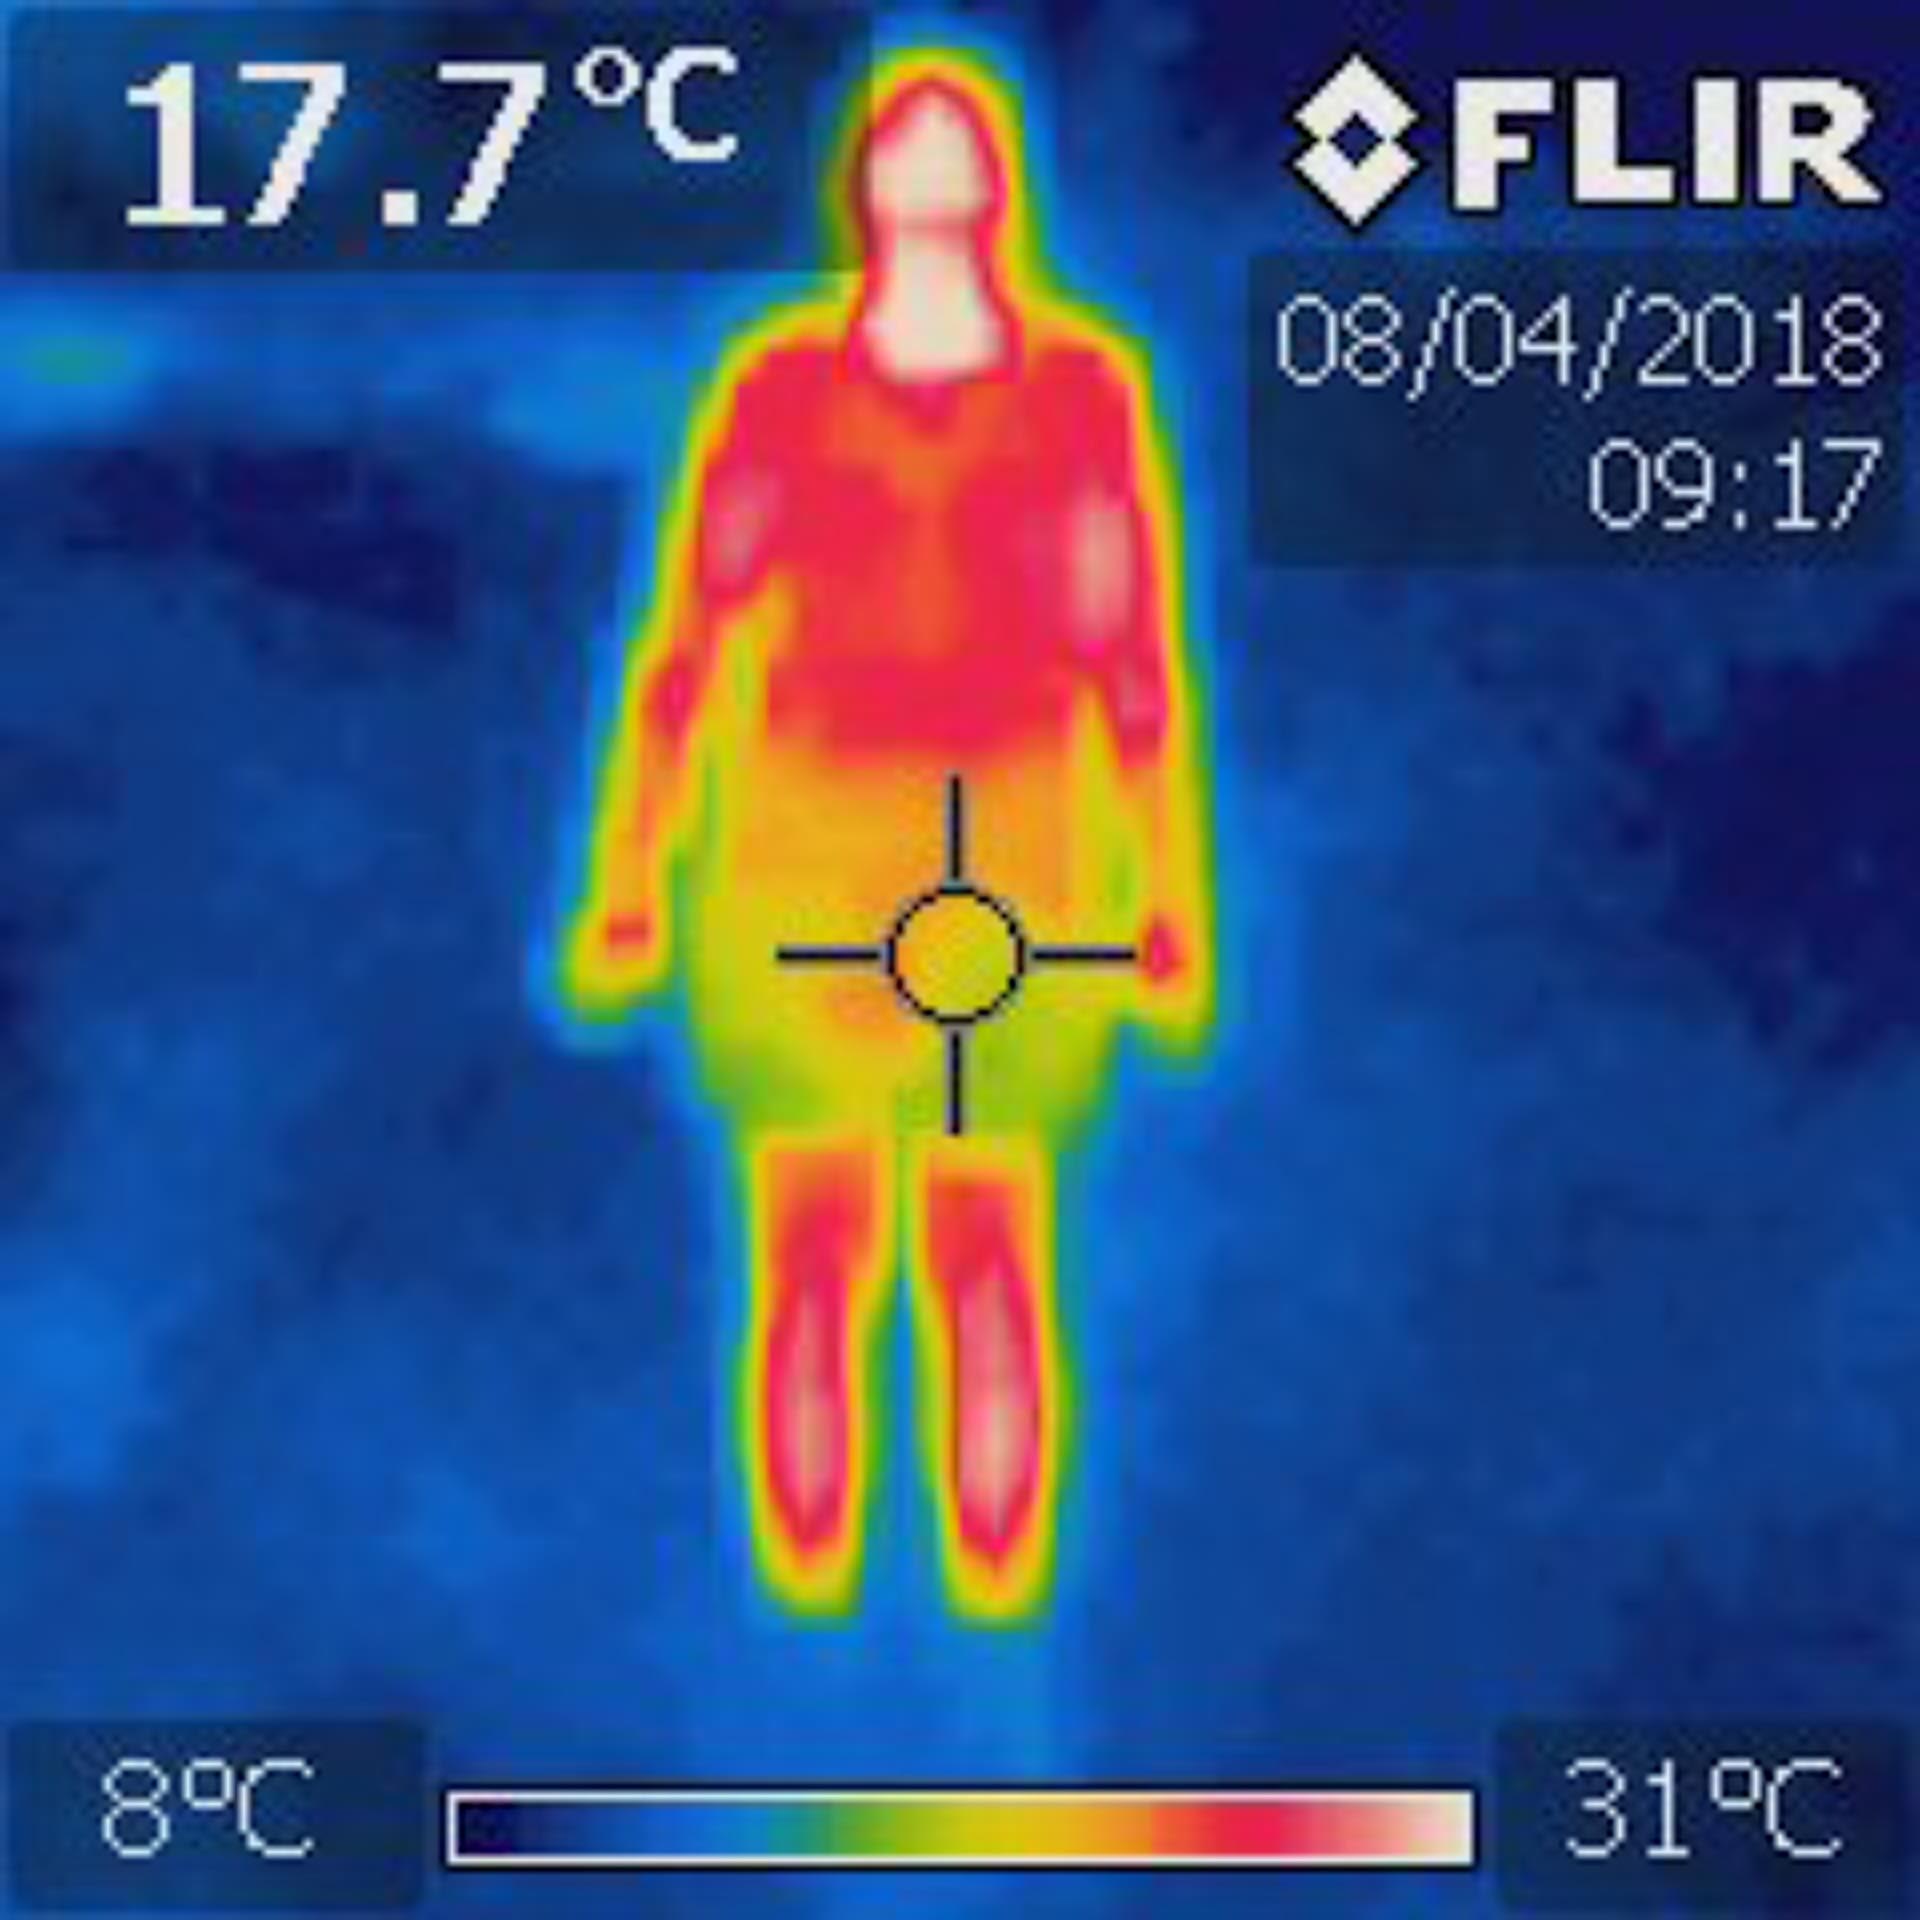
Tramper with wool top plus light jacket and thin wool longs and no mittens. Very high heat loss from face, neck, and hands, high from legs – but much better than above. 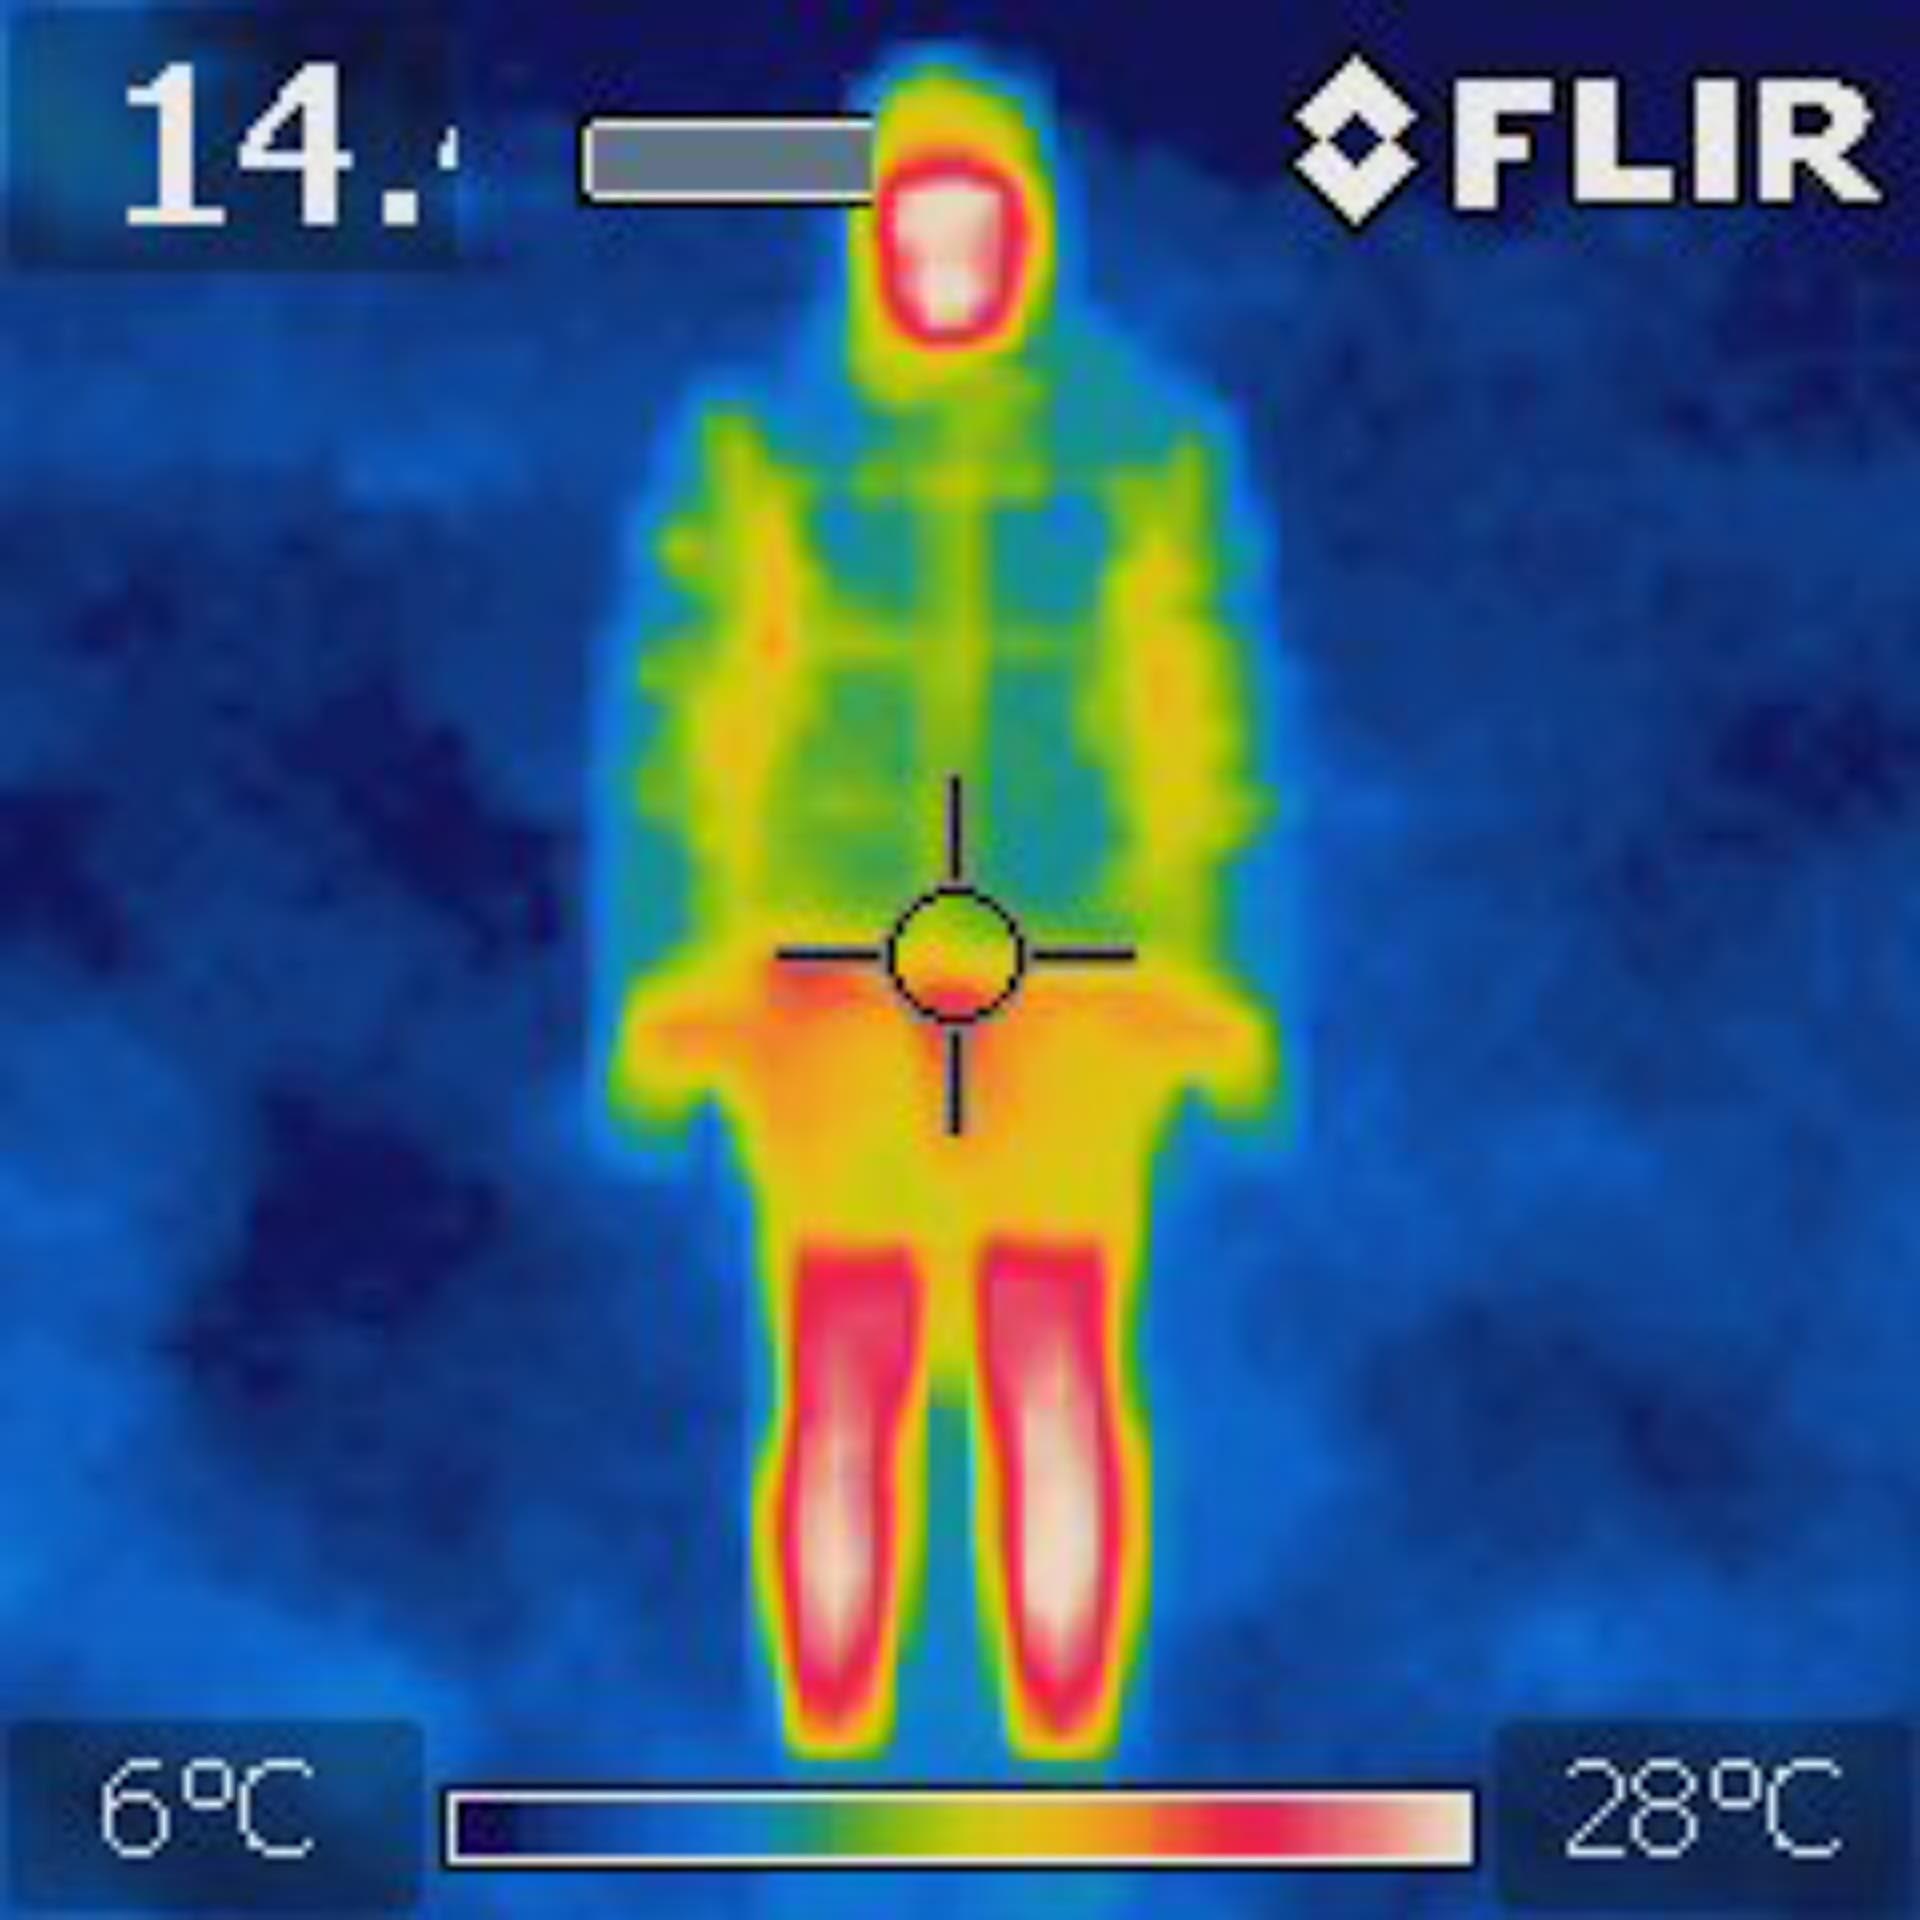
Tramper with ‘cheap’ duvet jacket with sewn-through seams, hood closed, wearing mittens and light wool longs. Jacket seams are leaking heat (yellow). High heat loss from face and legs. You can just about guess what each tramper is wearing – from jacket and longs to singlet and bare legs, and the large range of temperature losses. The ground temperature at the time of the photo was minus one degree Celius (frosty). 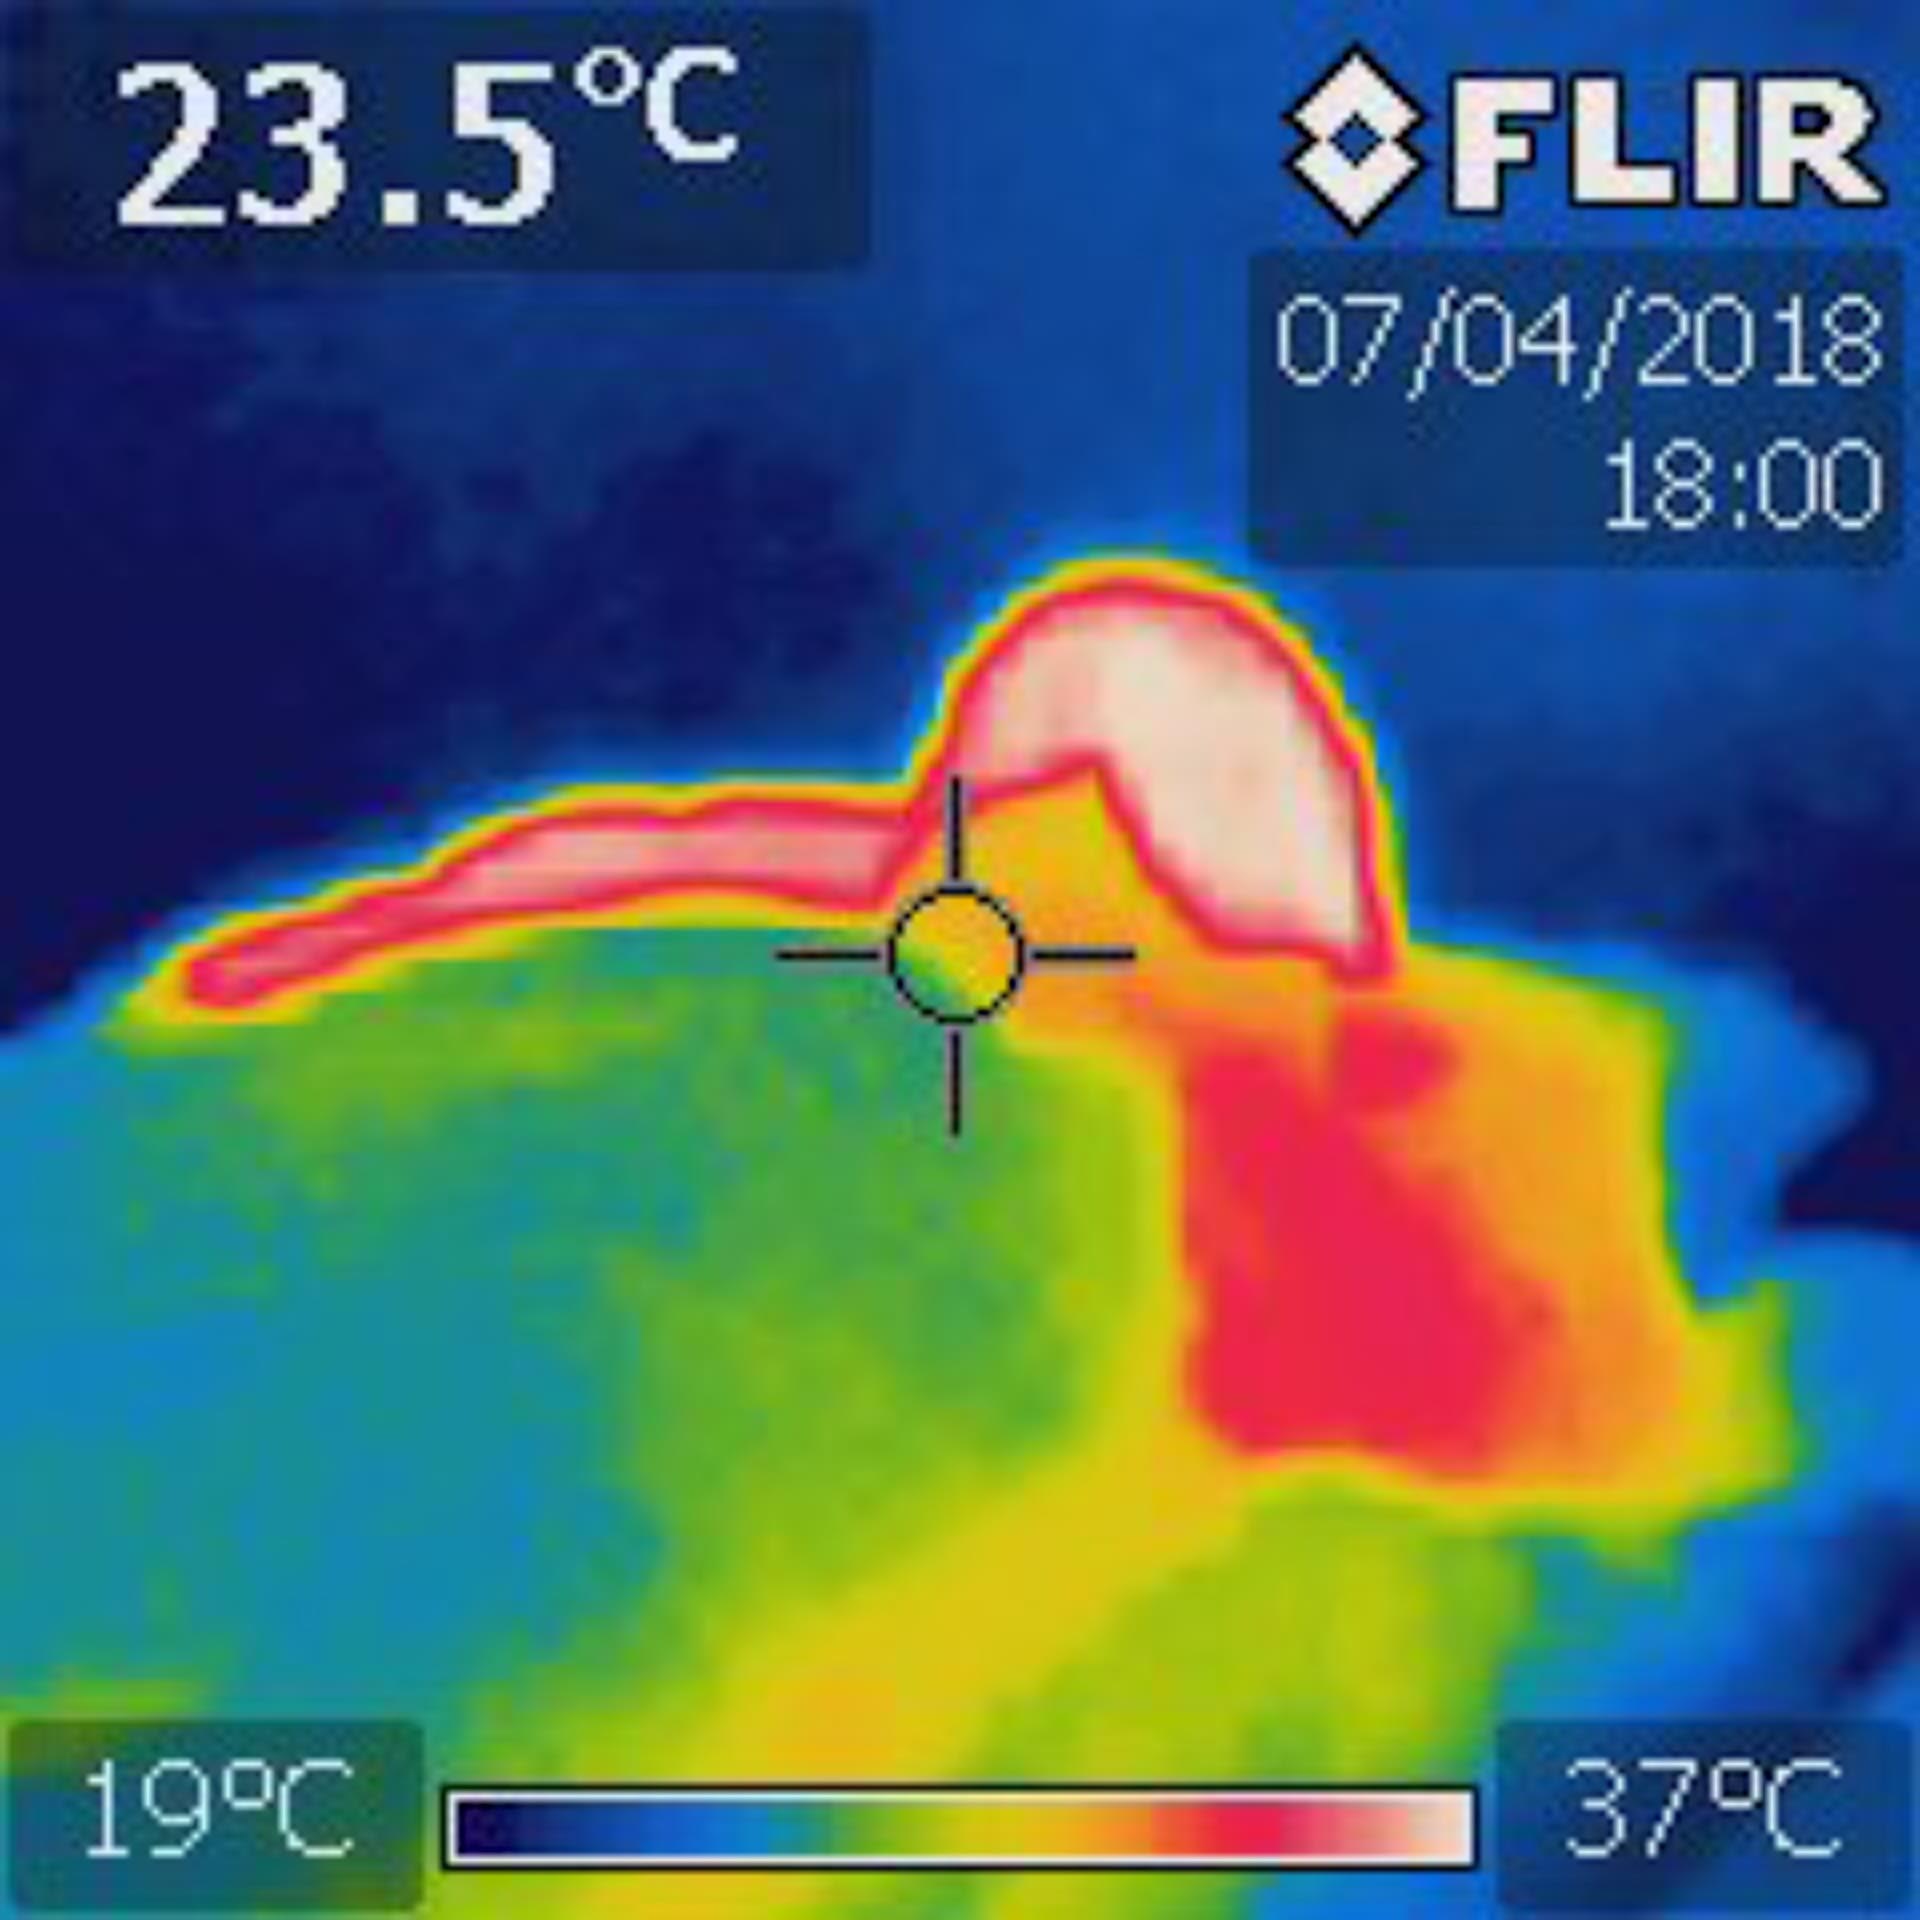
Upper body and head of tramper on their back in a sleeping bag. White is very high heat loss from their face. Red is high heat loss through sleeping bag around the hood and shoulders. Yellow strip is heat loss through the zip of the sleeping bag through poor quality or design. And this is in a warm hut.
Experiment 6Aim: To record and identify the track of some of the little critters that come sneaking around your tent at night.
Apparatus: Trapping tunnels with ink pads, bait.
Method: Set up a number of baited tunnels and check the white bases for inked foot prints in the morning.
Result and explanation: All the tunnels had multiple foot prints and the baits mostly eaten. Illona could identify many of the prints. They included the expected mice, rats and many beetle tracks. One tunnel had been pulled apart to allow something to get at the bait – there was some discussion as to what this may have been.
And then apart from the above experiments we looked at heaps of other stuff. Illona showed us putaputaweta trees riddled with holes from puriri beetles, told us about their life cycle, and gave us all the info on the forest trees we passed through. We watched the changing clouds in the sky, identified them, and made our own forecasts. We looked at the constellations at night and figured out how to find south for navigating, and much more. It was a fun weekend. A big thanks to Kate from all of us for thinking up the idea and getting it on the club trip schedule.
Adapted from a trip report in the 2018 WTMC annual journal
-
-
AuthorPosts